TLDR
This is all about testing Linux kernel changes on a QEMU virtual machine in cycles of build, install and run shortest than 5 minutes.
The Internet is full of tutorials about building the Linux Kernel, yet I found less content about applying the changes to a virtualized environment, so that will be the goal of this post.
Disclaimer: most of the online material refers to Debian/Ubuntu machines. I’d like to double it with an OpenSuse solution.
The full post
Few months ago I got my very first patch accepted to the Linux Kernel 🎉
Now, the patch itself is so simple that it is not much of interest, however what might help is how I tested it.
The two available approaches are
- test on real hardware (your machine)
- test on virtual hardware
I did not want to mess up with my machine, so I decided to look for virtualization, and the approach suggested from most of the sources is QEMU.
But first, how do we get there?
Step 1: install QEMU and create a VM
Here are the list of packages (for Debian/Ubuntu and OpenSuse) to install
[ubuntu]   $ sudo apt install qemu-kvm qemu   # there is a snap package too
[opensuse] $ sudo zipper install qemu-kvm qemu
Now, to run a virtualized Linux system we need a kernel (we will build it in step 2), and a filesystem. The latter can be created with tools like debootstrap, but to me it seemed easier to split the problem in two phases:
- create a “classic” VM with installing another Linux distro, which provides both filesystem AND kernel
- instruct QEMU to use our Kernel instead.
In my first attempt I used Ubuntu. The advantage was that I know it very well and it has a “minimal” install with a very small footprint compared with other distros. For this same reason, however, this time I want to try Alpine Linux, a lightweight distribution often used in containers.
so here are the steps:
- create a QEMU disk image
alpine.img - run QEMU from the ISO and install Alpine
- run QEMU from the disk and check that everything is OK
# Create the disk: a qcow2 format image of 2G
$ qemu-img create -f qcow2 alpine.img 2G

# Install Alpine following the guide https://wiki.alpinelinux.org/wiki/Install_Alpine_in_QEMU
$ qemu-system-x86_64 -cdrom alpine-downloaded.iso alpine.img -m 512M -enable-kvm

# Run the newly installed image from the disk
$ qemu-system-x86_64 -enable-kvm -m 512M -smp 4 -cpu host -drive file=./alpine.img
Let’s identify which kernel this machine is using now
[inside alpine vm shell] $ uname -r
5.15.32-0-lts
Now the usual content, build our custom kernel 🙄
Step 2: build and run your Linux Kernel
Get a copy of the Linux Kernel
$ git clone --depth=1 git://git.kernel.org/pub/scm/linux/kernel/git/torvalds/linux.git
Install the packages needed for the build1
[ubuntu]   $ sudo apt-get install git fakeroot build-essential ncurses-dev xz-utils libssl-dev bc flex libelf-dev bison
[opensuse] $ sudo zypper in -y -t pattern devel_basis && zypper in -y bc openssl openssl-devel dwarves rpm-build libelf-devel
Configure the build using KVM specific target2
$ cd linux
$ make defconfig
$ make kvm_guest.config
What are those commands? Looking at the Linux kernel’s Make help, we can see that:
$ make help | grep -e defconfig -e kvm_guest.config
  defconfig         - New config with default from ARCH supplied defconfig
  kvm_guest.config  - Enable Kconfig items for running this kernel as a KVM guest
I also want to mark my kernel version, so that I can recognize it once running. There are two options for this:
- change
CONFIG_LOCALVERSIONin .config file - change
EXTRAVERSIONvariable inMakefile
I will go for option 2, changing EXTRAVERSION from “-rc2” to “-rc2-custom”.
Finally build the kernel
$ make -j$(nproc)
Since the configuration is very minimal, the build should take few minutes even the first time.
Now we want to run our Alpine image with this specific kernel, for witch we need to change QEMU command line3
$ qemu-system-x86_64 \
        -enable-kvm -m 512M -smp 4 -cpu host \
        -kernel ~/linux/arch/x86_64/boot/bzImage \
        -append "root=/dev/sda3 console=ttyS0 rw" \
        -drive file=./alpine.img
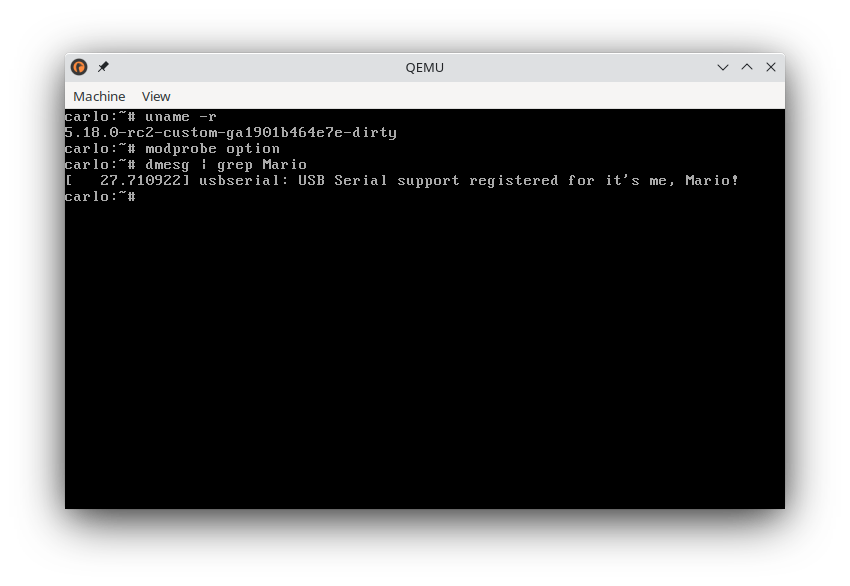
identify again the kernel, this is our custom version 🥳
[inside alpine shell] $ uname -r
5.18.0-rc2-custom-ga1901b464e7e
Step3: Make a change
This is the purpose of my kernel patch, but since not everyone has a Telit LN920 modem to test this, let’s make instead a dummy change, just for the sake of seeing our changes loaded at runtime.
The target will be the module USB Driver for GSM modems which is called “option” (needless to say that’s a terrible name if you want to google it), located under /drivers/usb/serial folder, and needs to be enabled in the .config file.
Enabling it might look complex the first time, but it’s pretty easy
- Run
$ make menuconfigto show an ncurses based menu. - Press slash ("/") to search
CONFIG_USB_SERIAL_OPTIONand then press “1” in order to jump to “USB Serial Converter support”. Press “m” to select it. - Search again
CONFIG_USB_SERIAL_OPTION, pressing “1” the menu will jump to a different field “USB driver for GSM and CDMA modems”. Press “m” to select it. - Exit from menuconfig selecting “exit” in the bottom bar.
Now the change, let’s make something really useful:
diff --git a/drivers/usb/serial/option.c b/drivers/usb/serial/option.c
index e7755d9cf..534e8051e 100644
--- a/drivers/usb/serial/option.c
+++ b/drivers/usb/serial/option.c
@@ -2138,7 +2138,7 @@ static struct usb_serial_driver option_1port_device = {
 		.owner =	THIS_MODULE,
 		.name =		"option1",
 	},
-	.description       = "GSM modem (1-port)",
+	.description       = "it's me, Mario!",
 	.id_table          = option_ids,
 	.num_ports         = 1,
 	.probe             = option_probe,
Yes! Let’s change the driver’s description from “GSM modem (1-port)” into the silly “It’s me, Mario!”. This description will be printed in the syslog when the driver is loaded. Now, build the modules.
$ make -j$(nproc) modules
 SYNC    include/config/auto.conf.cmd
 DESCEND objtool
 CALL    scripts/atomic/check-atomics.sh
 CALL    scripts/checksyscalls.sh
 CC [M]  drivers/usb/serial/usb-serial.o
 CC [M]  drivers/usb/serial/generic.o
 CC [M]  drivers/usb/serial/bus.o
 CC [M]  drivers/usb/serial/option.o
 CC [M]  drivers/usb/serial/usb_wwan.o
 LD [M]  drivers/usb/serial/usbserial.o
 MODPOST modules-only.symvers
 GEN     Module.symvers
 CC [M]  drivers/usb/serial/option.mod.o
 CC [M]  drivers/usb/serial/usb_wwan.mod.o
 CC [M]  drivers/usb/serial/usbserial.mod.o
 LD [M]  drivers/usb/serial/usb_wwan.ko
 LD [M]  drivers/usb/serial/usbserial.ko
 LD [M]  drivers/usb/serial/option.ko       <--- here it is!
But, how do we push this change in our QEMU image?
The first problem
None of the modules built with our kernel will be loaded in our QEMU image 😈
In fact, kernel modules are loaded from path /lib/modules/$(uname -r), which is now /lib/modules/5.18.0-rc2-custom-ga1901b464e7e, but our QEMU image does not have such folder, since it was installed with a different kernel version.
In the past I used a cumbersome solution consisting in:
- build a Debian package of the kernel with
$ make bindeb-pkg - create a shared folder to copy the deb into our QEMU image
- install the deb package with
dpkg -i *.deb
which works, but there is a nicer solution: mount our QEMU image in the HOST machine and then instruct Make to install the modules into this location 💪.
Let’s see how this is possible
Install kernel modules into QEMU image
Use guestmount (which comes with libguestfs-tools on Debian/Ubuntu, or guestfs-tools on OpenSuse), to mount our QEMU disk image
$ mkdir -pv /tmp/alpine
$ guestmount --add alpine.img --mount /dev/sda3 /tmp/alpine
$ ls /tmp/alpine
bin   dev  home  lost+found  mnt  proc  run   srv   sys  usr
boot  etc  lib   media       opt  root  sbin  swap  tmp  var
Then use “INSTALL_MOD_PATH” variable to change kernel’s module installation path
# INSTALL_MOD_PATH specifies a prefix to MODLIB for module directory
# relocations required by build roots.  This is not defined in the
# makefile but the argument can be passed to make if needed.
which means that simply doing the following will accomplish our goal
$ make -j$(nproc)
...
$ make -j$(nproc) modules
$ INSTALL_MOD_PATH=/tmp/alpine make modules_install
INSTALL /tmp/alpine/lib/modules/5.18.0-rc2-custom-ga1901b464e7e-dirty/kernel/drivers/thermal/intel/x86_pkg_temp_thermal.ko
INSTALL /tmp/alpine/lib/modules/5.18.0-rc2-custom-ga1901b464e7e-dirty/kernel/drivers/usb/serial/option.ko
INSTALL /tmp/alpine/lib/modules/5.18.0-rc2-custom-ga1901b464e7e-dirty/kernel/drivers/usb/serial/usb-serial-simple.ko
INSTALL /tmp/alpine/lib/modules/5.18.0-rc2-custom-ga1901b464e7e-dirty/kernel/drivers/usb/serial/usb_wwan.ko
INSTALL /tmp/alpine/lib/modules/5.18.0-rc2-custom-ga1901b464e7e-dirty/kernel/drivers/usb/serial/usbserial.ko
INSTALL /tmp/alpine/lib/modules/5.18.0-rc2-custom-ga1901b464e7e-dirty/kernel/fs/efivarfs/efivarfs.ko
INSTALL /tmp/alpine/lib/modules/5.18.0-rc2-custom-ga1901b464e7e-dirty/kernel/net/ipv4/netfilter/iptable_nat.ko
INSTALL /tmp/alpine/lib/modules/5.18.0-rc2-custom-ga1901b464e7e-dirty/kernel/net/netfilter/nf_log_syslog.ko
INSTALL /tmp/alpine/lib/modules/5.18.0-rc2-custom-ga1901b464e7e-dirty/kernel/net/netfilter/xt_LOG.ko
INSTALL /tmp/alpine/lib/modules/5.18.0-rc2-custom-ga1901b464e7e-dirty/kernel/net/netfilter/xt_MASQUERADE.ko
INSTALL /tmp/alpine/lib/modules/5.18.0-rc2-custom-ga1901b464e7e-dirty/kernel/net/netfilter/xt_addrtype.ko
INSTALL /tmp/alpine/lib/modules/5.18.0-rc2-custom-ga1901b464e7e-dirty/kernel/net/netfilter/xt_mark.ko
INSTALL /tmp/alpine/lib/modules/5.18.0-rc2-custom-ga1901b464e7e-dirty/kernel/net/netfilter/xt_nat.ko
DEPMOD  /tmp/alpine/lib/modules/5.18.0-rc2-custom-ga1901b464e7e-dirty
$ umount /tmp/alpine
Final result
Finally we can restart our VM and load the new option driver with modprobe option and read the syslog with dmesg.
-
Thanks to Hayden Barnes for the OpenSuse dependencies 👍. ↩︎
-
Note that this configuration is very minimal. Many normal features are not enabled (USB for example). More about this in step 3. ↩︎
-
The root
/dev/sda3is where Alpine filesystem was installed. It should show up during installation phase, but you can also go by try and error starting from sda1. ↩︎